
DC505 Fuser Setup
Set up the DC505 fuser: ports, buttons, status lights, firmware updates, EDID injection, the capture card and OBS. Includes the firmware download.
The DC505 is a dual-PC display fuser. It takes the picture from your gaming PC and your second (cheat) PC and combines them into one image on a single monitor, so the overlay your second PC draws sits on top of the game.
This guide covers the ports, the four buttons, the status lights, the panel readout, firmware updates, EDID injection, and using the built-in capture card with OBS.
Downloads
| What | Link | Password |
|---|---|---|
| DC505DHC firmware and update tool | dckj686.lanzoup.com/b00l2vr7sd | 686 |
| General tools (serial driver, utilities) | wwqt.lanzoum.com/b04wf3l0b | 6666 |
Extract the archives before use — the update tool is flash_update_release.rar, and the firmware file looks
like DC505DHC_06_16_2026_update.rar. Inside each firmware archive is the .bin you flash.
1. Specifications
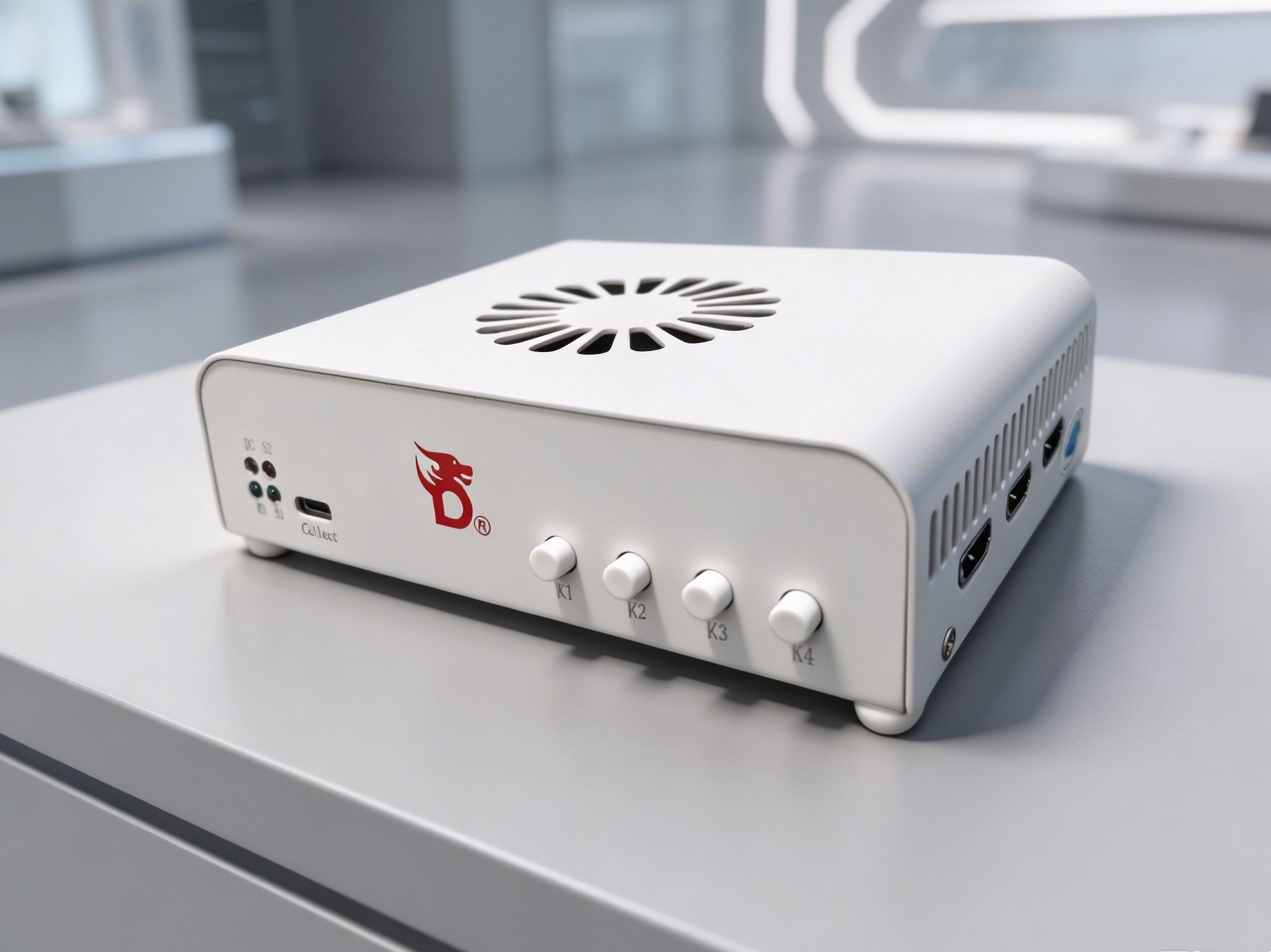
Six video ports: three HDMI 2.1 (48 Gbps) and three DisplayPort 1.4 (32.4 Gbps).
Important
You can run three HDMI cables or three DisplayPort cables, but not a mixture of both. HDMI + DP combined is not supported on the current firmware.
HDMI 2.1
- Supports up to 1K 550 Hz / 2K 360 Hz / 4K 160 Hz. Those figures assume a low-timing monitor, a modified EDID, or edited panel timings in the driver; natively most panels do 1K 500 / 2K 320 / 4K 144.
- 50-series cards do not flicker. Newer laptops are recognised (some 5070 Ti and newer machines need the 12G × 4 link mode).
- Lower refresh rates work as well, and ultrawide screens are supported.
- Monitor: must have a full-bandwidth HDMI 2.1 FRL port (48 Gbps).
- Graphics card: must have a full-bandwidth HDMI 2.1 FRL port (48 Gbps).
- Both PCs should have at least an Nvidia GTX 3060 or AMD RX 6500 XT. The secondary monitor does not count against this.
- AMD 6000-series and Nvidia 50-series cards reach 4K 160 / 2K 360 / 1K 550. Nvidia 30- and 40-series are capped by forced DSC at 4K 144 / 2K 320 / 1K 480.
- Second-PC CPU: at least 6 threads suggested.
DisplayPort 1.4
- Supports up to 1K 500 / 2K 320 / 4K 144, on essentially any monitor, card or laptop. A small number of panels top out at 1K 480 / 2K 240 / 4K 120.
- Lower refresh rates work, and ultrawide screens are supported.
- Monitor and graphics card: must have DisplayPort 1.4 or 2.1.
- Minimum cards: Nvidia 10-series or AMD RX 500-series and above. The secondary monitor does not count.
- Second-PC CPU: at least 6 threads suggested.
1.1 Main connections

| Port | Purpose |
|---|---|
DC12V | Main power supply |
12V3A | Optional auxiliary power — can be left unconnected |
Type-C | Debug and firmware port — optional, needed for updates and EDID injection |
Collect | Capture output. Requires a USB 3.0 Type-C to USB cable, or Type-C to Type-C |
1.2 HDMI ports
HDMI 主机/ HDMI Host → the gaming PC's graphics cardHDMI 副机/ HDMI Second → the second PC's graphics cardHDMI 显示器/ HDMI Monitor → the monitor you look at
1.3 DisplayPort ports
DP 主机/ DP Host → the gaming PC's graphics cardDP 副机/ DP Second → the second PC's graphics cardDP 显示器/ DP Monitor → the monitor you look at
1.4 Power switch
POWER — press in to turn on, release out to turn off.
2. The four buttons
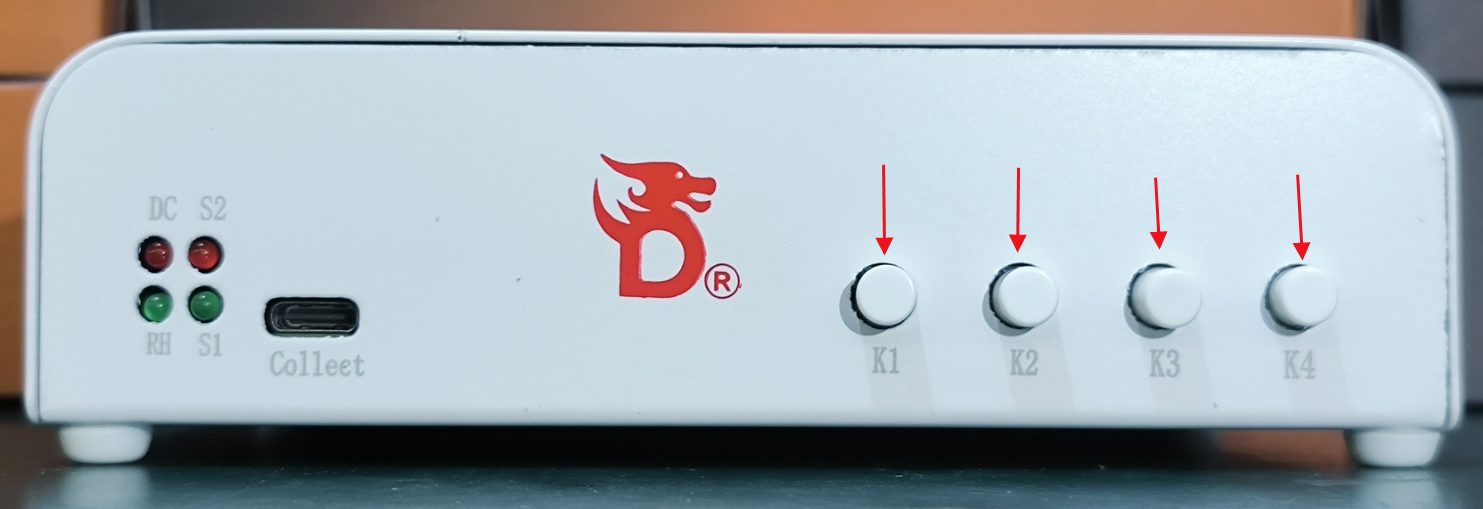
Each button does one thing on a short press and another on a long press (hold 3–5 seconds, then release).
K1
- Short press — show the parameter overlay in the top-left corner of the screen.
- Long press — cycle the EDID mode: A (adaptive/universal), B (native), C (injected). Try these when a display is not detected. The fuser restarts itself when the mode changes.
K2
- Short press — increase the keying strength. The number appears top-left:
0is no keying,5–255are increasing amounts. - Long press — cycle the link rate between 10G (default) and 12G. Use 12G on 5070 Ti and newer.
K3
- Short press — cycle the overlay/fusion mode. Keying strength returns to its default of 5.
- Long press — factory reset. The mode is kept, but link rate and keying strength return to defaults.
Tip
After a firmware update, hold K3 for 5 seconds to reset before using the fuser normally.
K4
- Short press — switch which PC is displayed, and turn fusion keying off.
- Long press — cycle the capture mode:
0captures the host PC only,1captures the fused picture.
3. Status lights
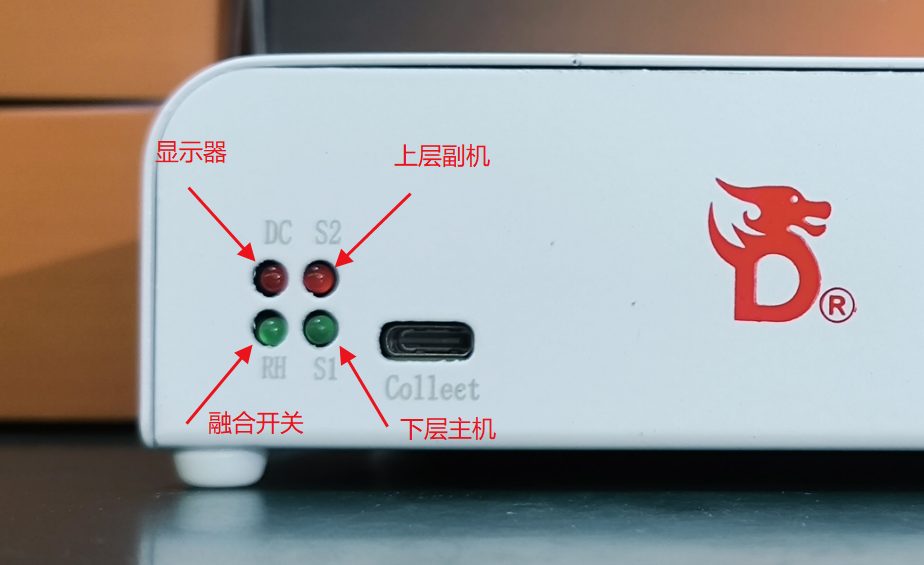
| Light | Meaning when unlit |
|---|---|
DC | The fuser is not connected to the monitor. Check the port and cable; power-cycle the monitor if needed. |
RH | Fusion keying is off. Lit means fusion is running normally. |
S2 | The fuser is not connected to the second PC. Check both ends and the cable; restart the second PC. |
S1 | The fuser is not connected to the host PC. Check both ends and the cable; restart the host. |
4. Panel readout
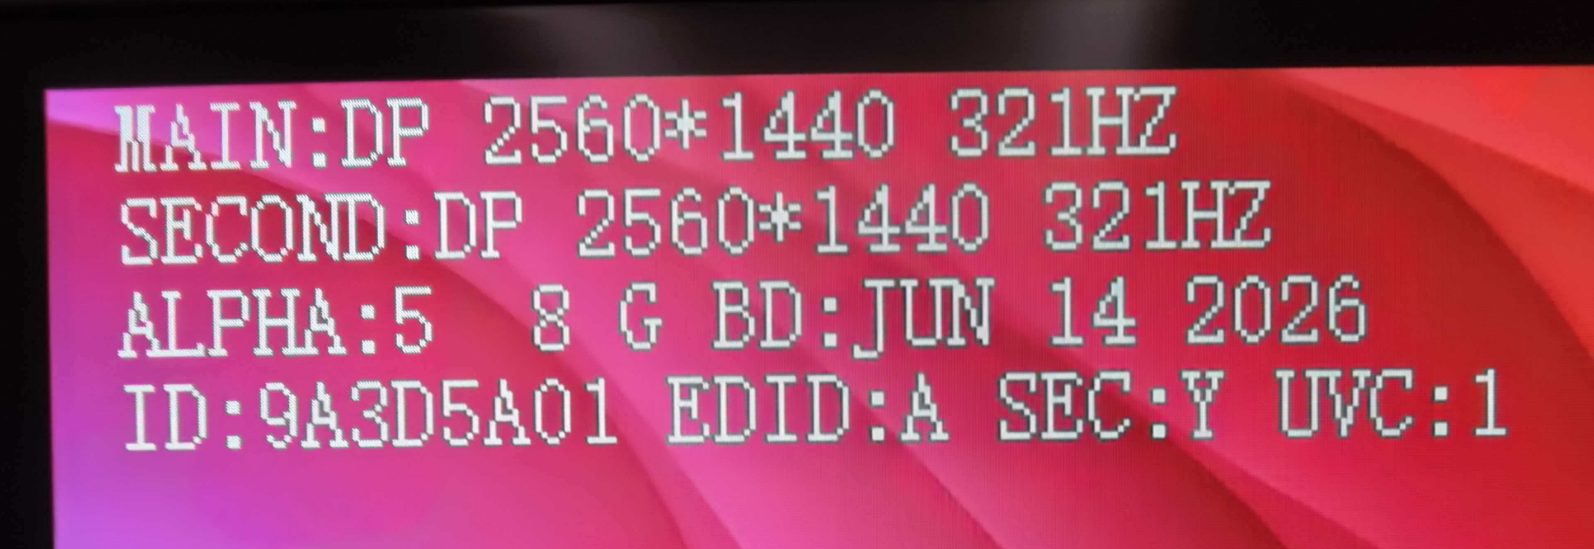
Short-press K1 to show this on-screen.
| Field | Meaning |
|---|---|
MAIN | Resolution and refresh rate of the host PC (S1) |
SECOND | Resolution and refresh rate of the second PC (S2) |
ALPHA | Keying strength: 0 off, 5–255 increasing |
| Link rate | Shown between ALPHA and BD — e.g. 8G. HDMI can be 10G or 12G |
BD | Firmware build date |
ID | The device's unique chip ID |
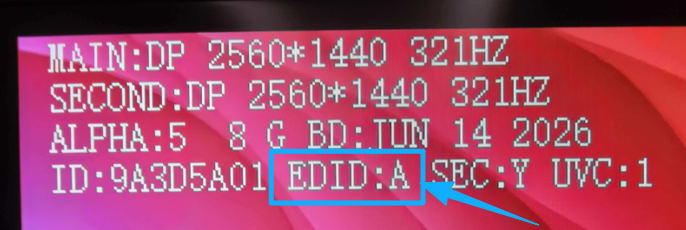
EDID | Detection mode: A, B or C. Default is A. Hold K1 for 5 seconds to cycle — B is the fallback if A gives no picture. The fuser restarts when the mode changes |
SEC | Activation state: YES activated, NO not activated |
UVC | Capture mode: 0 host PC only, 1 fused picture |
5. Updating the firmware
Before you start: download and extract flash_update_release.rar (the flashing tool) and the firmware
archive, e.g. DC505DHC_06_16_2026_update.rar. Connect a USB cable from the PC to the fuser's Type-C port —
the one nearest the power connector.
-
Power the fuser off.
-
Hold K2 and K3 together, press the power button to switch the fuser on, and release K2 and K3 after about 2 seconds.
-
Open
uart_transfer_BIN_to_EX-Flash.exe. -
Choose the Ports serial port and click OPEN Port.
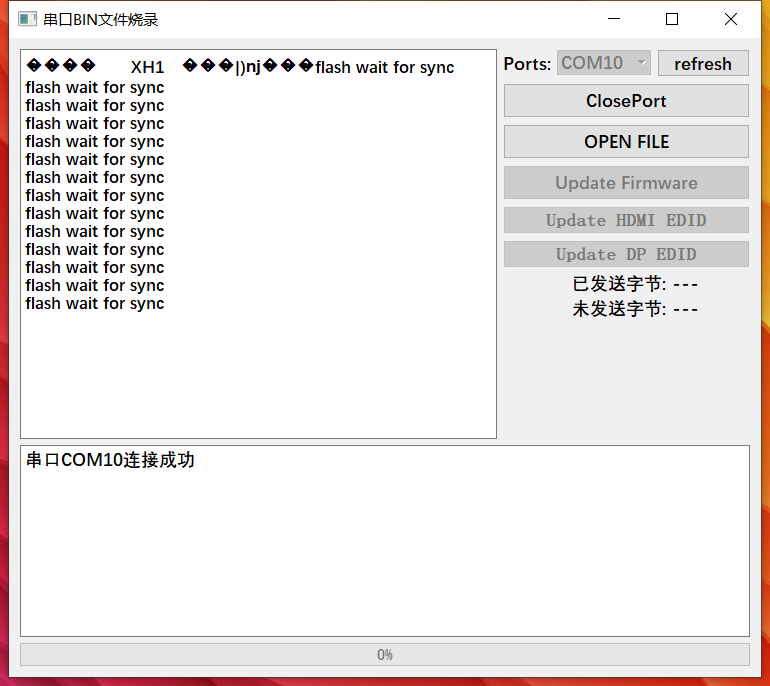
If you see
flash wait for sync, it is ready — continue. If you see anything else, start again from step 1. -
Click OPEN FILE and choose the firmware
.bin, e.g.DC505DHC_06_16_2026_update.bin. -
Click Update Firmware, enter the password
123456, confirm, and wait.
A progress bar runs along the bottom; wait for 100%. Losing power or the tool freezing part-way does not brick the device — you can simply run the update again. When it finishes you can close the tool and power-cycle the fuser; then hold K3 for 5 seconds to reset it before normal use.
6. Injecting an EDID
You do this to make the fuser present a specific monitor identity — useful when a display will not sync, or to unlock a higher refresh rate than the panel advertises.
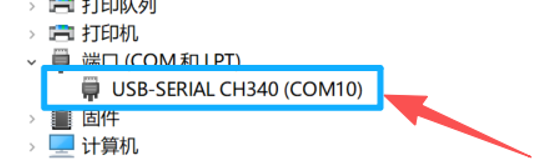
Before you start: download and extract flash_update_release.rar and the firmware archive, and connect USB
from the PC to the Type-C port nearest the power connector. Device Manager should list
USB-SERIAL CH340 (COM10). If it does not, install the serial driver from the tools download.
-
Power the fuser off.
-
Hold K2 and K3 together, press the power button, and release after about 2 seconds.
-
Open
uart_transfer_BIN_to_EX-Flash.exe. -
Choose the Ports serial port and click OPEN Port.
You should see
flash wait for sync. Other output means start again from step 1; a blank window means the serial port is not connected. -
Click OPEN FILE and choose the EDID file — HDMI and DP files are different, so pick the matching one.
-
Choose the signal to inject: Update HDMI EDID or Update DP EDID.
The progress bar reaches 100% and you can close the tool and the fuser. Power-cycle it, then hold K1 for 3 seconds to switch to C mode — the injected parameters only take effect in C mode. Short-press K1 to see which mode is active.
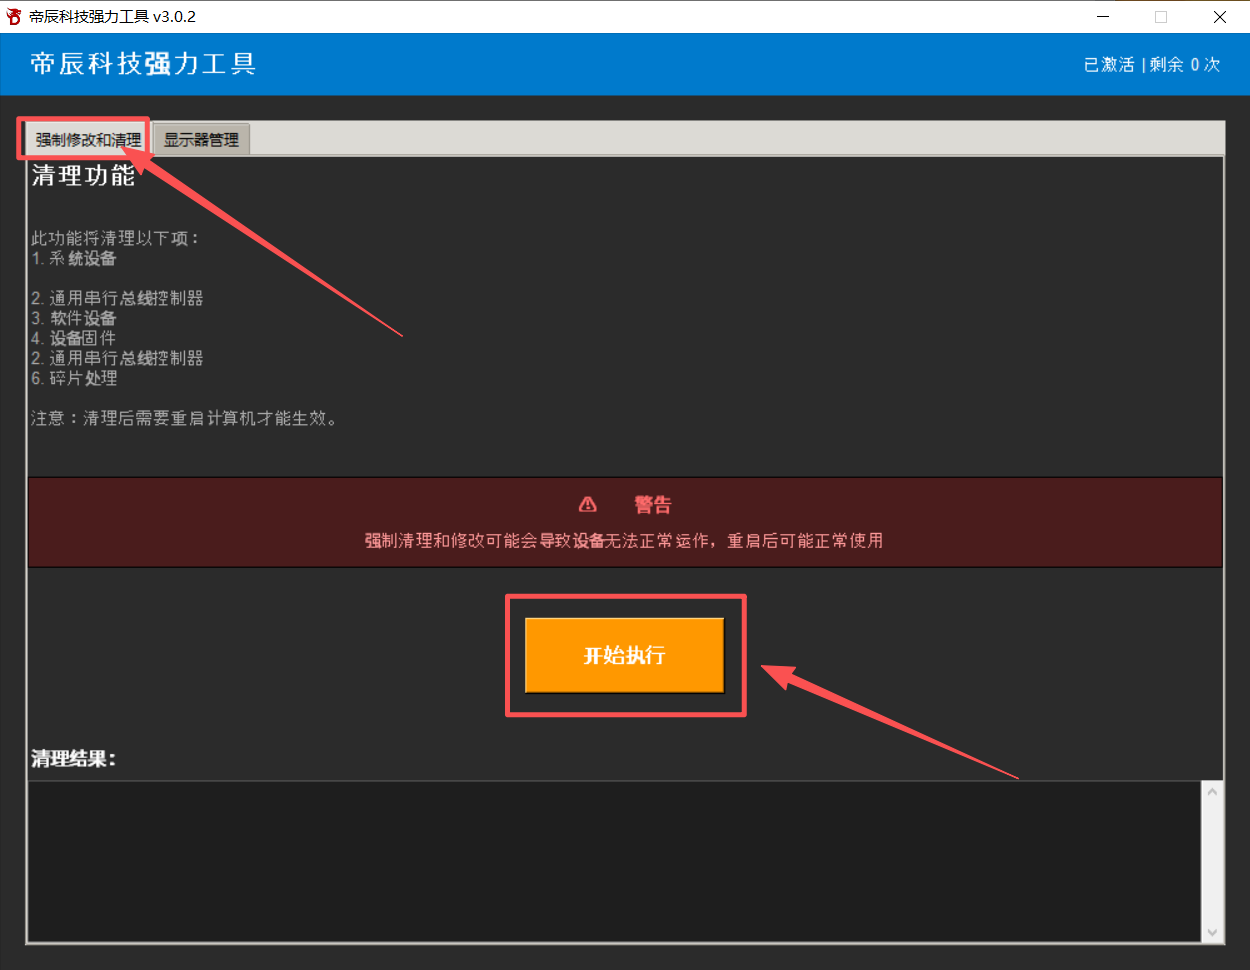
Afterwards, if the PC still reports the old display, clear the cached EDID with the DC tool (帝辰科技强力工具 V3.0.2 — the vendor's utility, in the tools download) and restart the PC so the new display is detected.
7. Using the capture card
Install the driver on the PC that will stream or record — not the gaming PC.
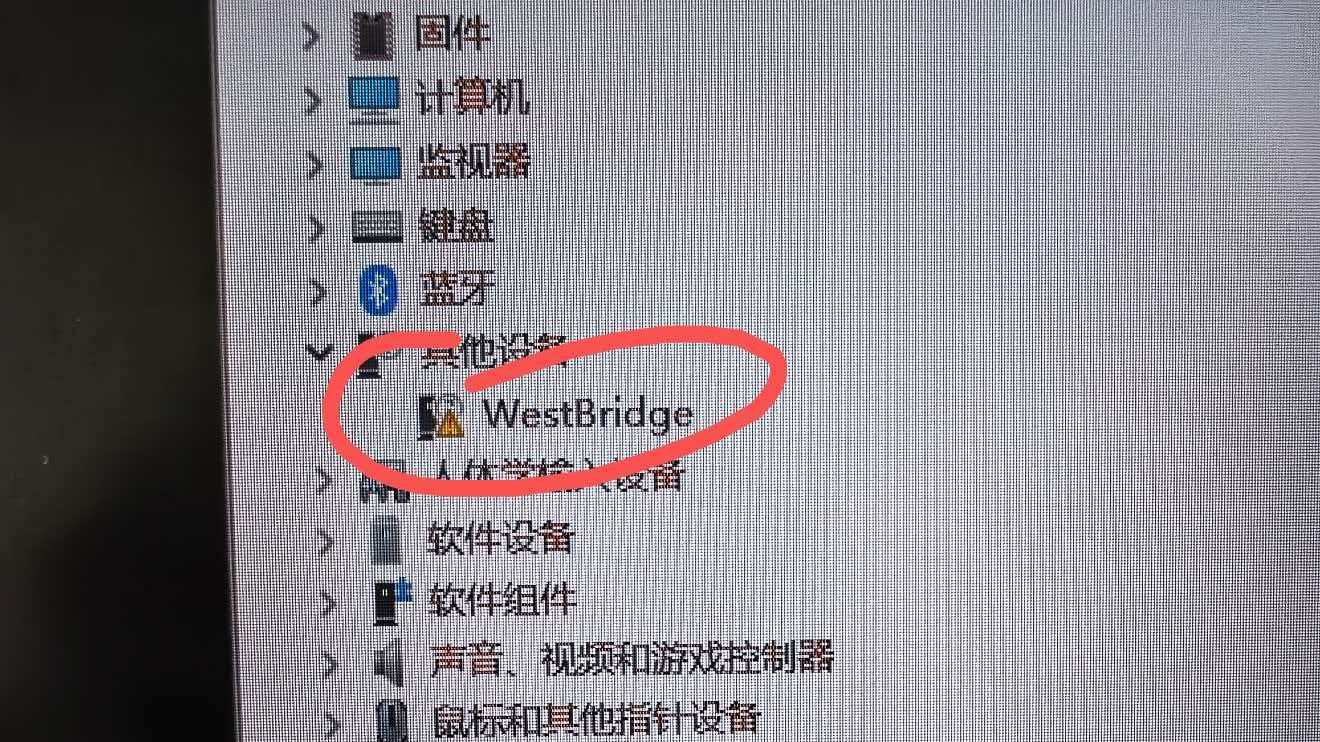
Before you start: download and extract OBS dckj.rar. Connect a Type-C cable to the Collect port on the
front, and the other end to a USB 3.0 or Type-C/Thunderbolt/USB4 port on the streaming PC.
-
Open Device Manager, find WestBridge, right-click and choose Update driver.
-
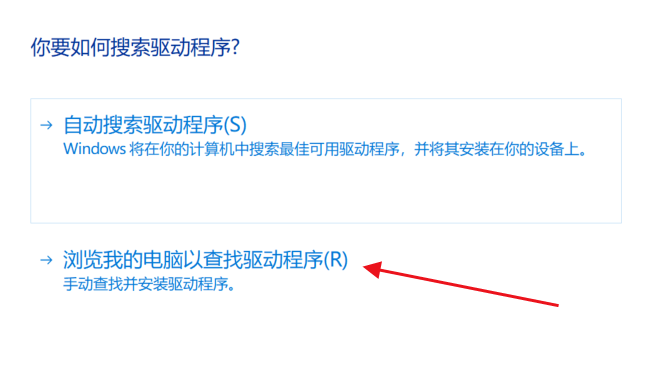
Choose Browse my computer for drivers.
-
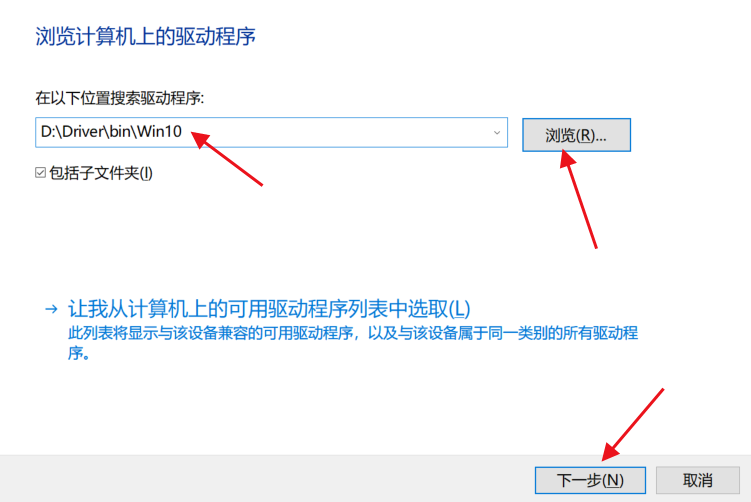
Browse to the
Driver\binfolder insideOBS dckj.rarand pick the Windows 10 or Windows 11 subfolder to match your system.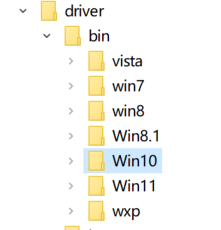
-
Finish the wizard and power-cycle the fuser, then OBS can use it.
Note
A Type-C to USB 3.0 cable only works one way round — if the capture device does not appear, flip the connector. Type-C to Type-C cables work either way.
8. Adding it in OBS
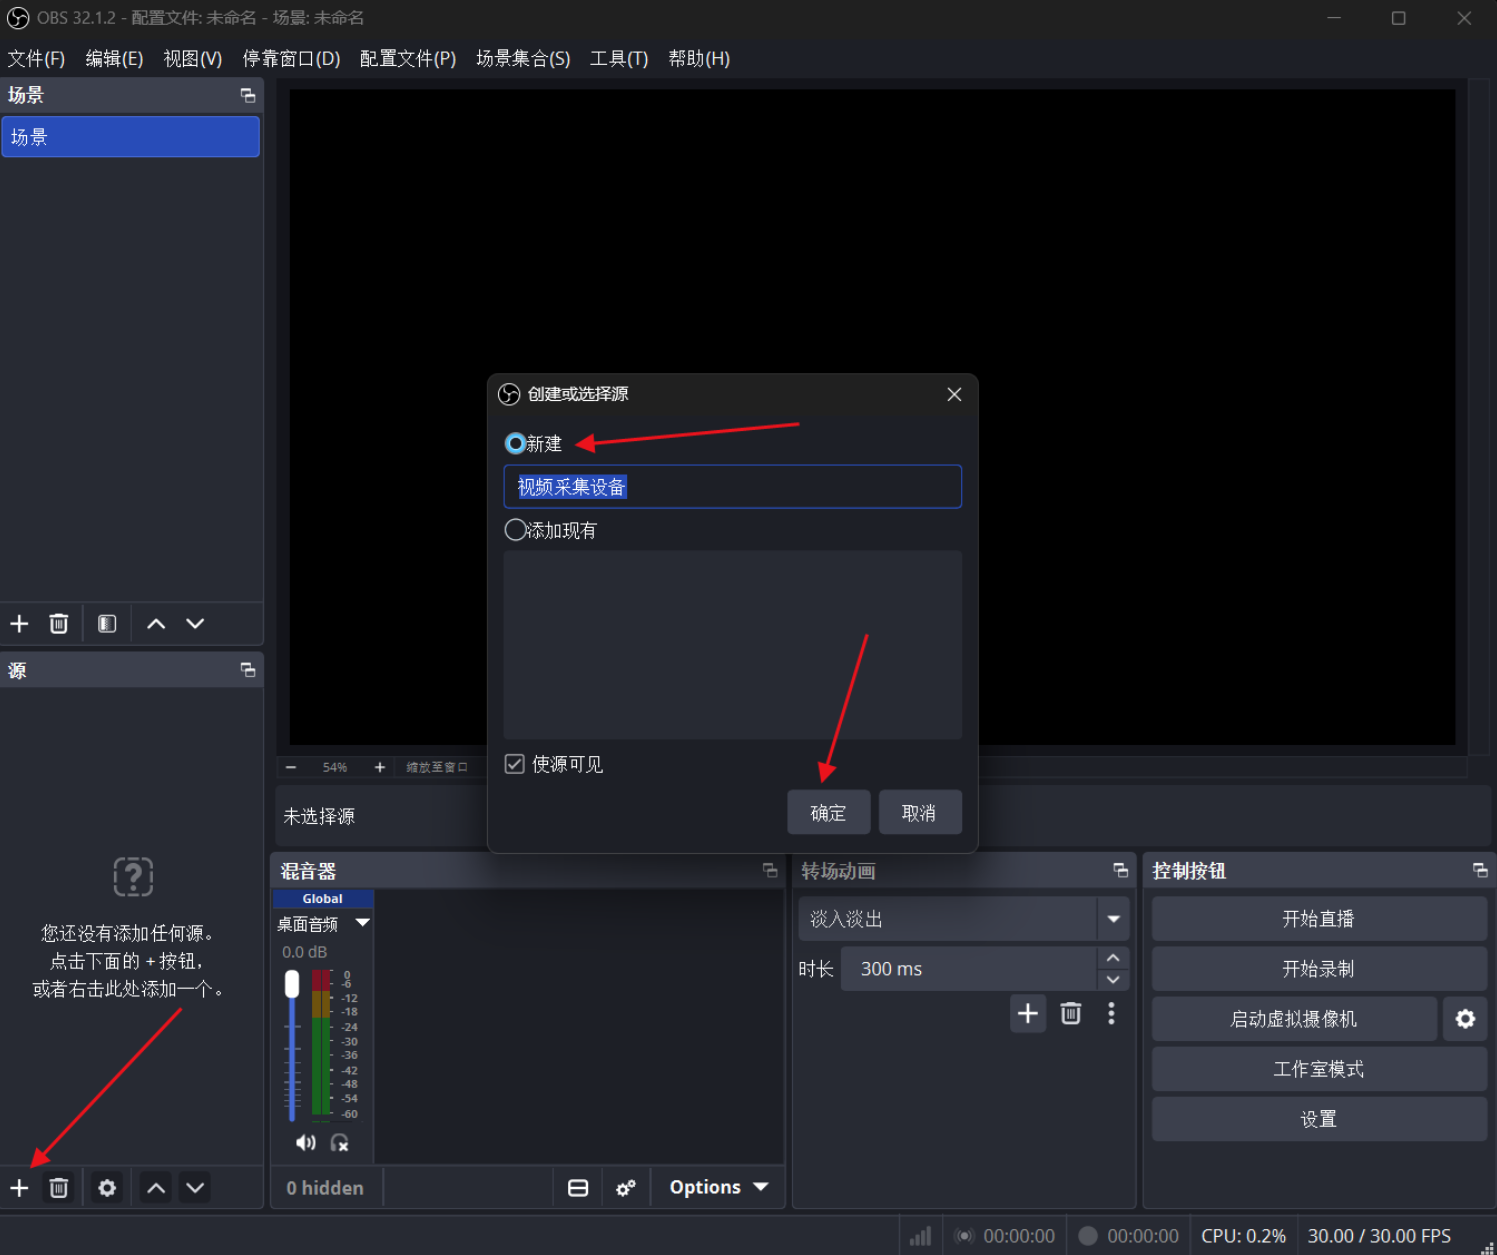
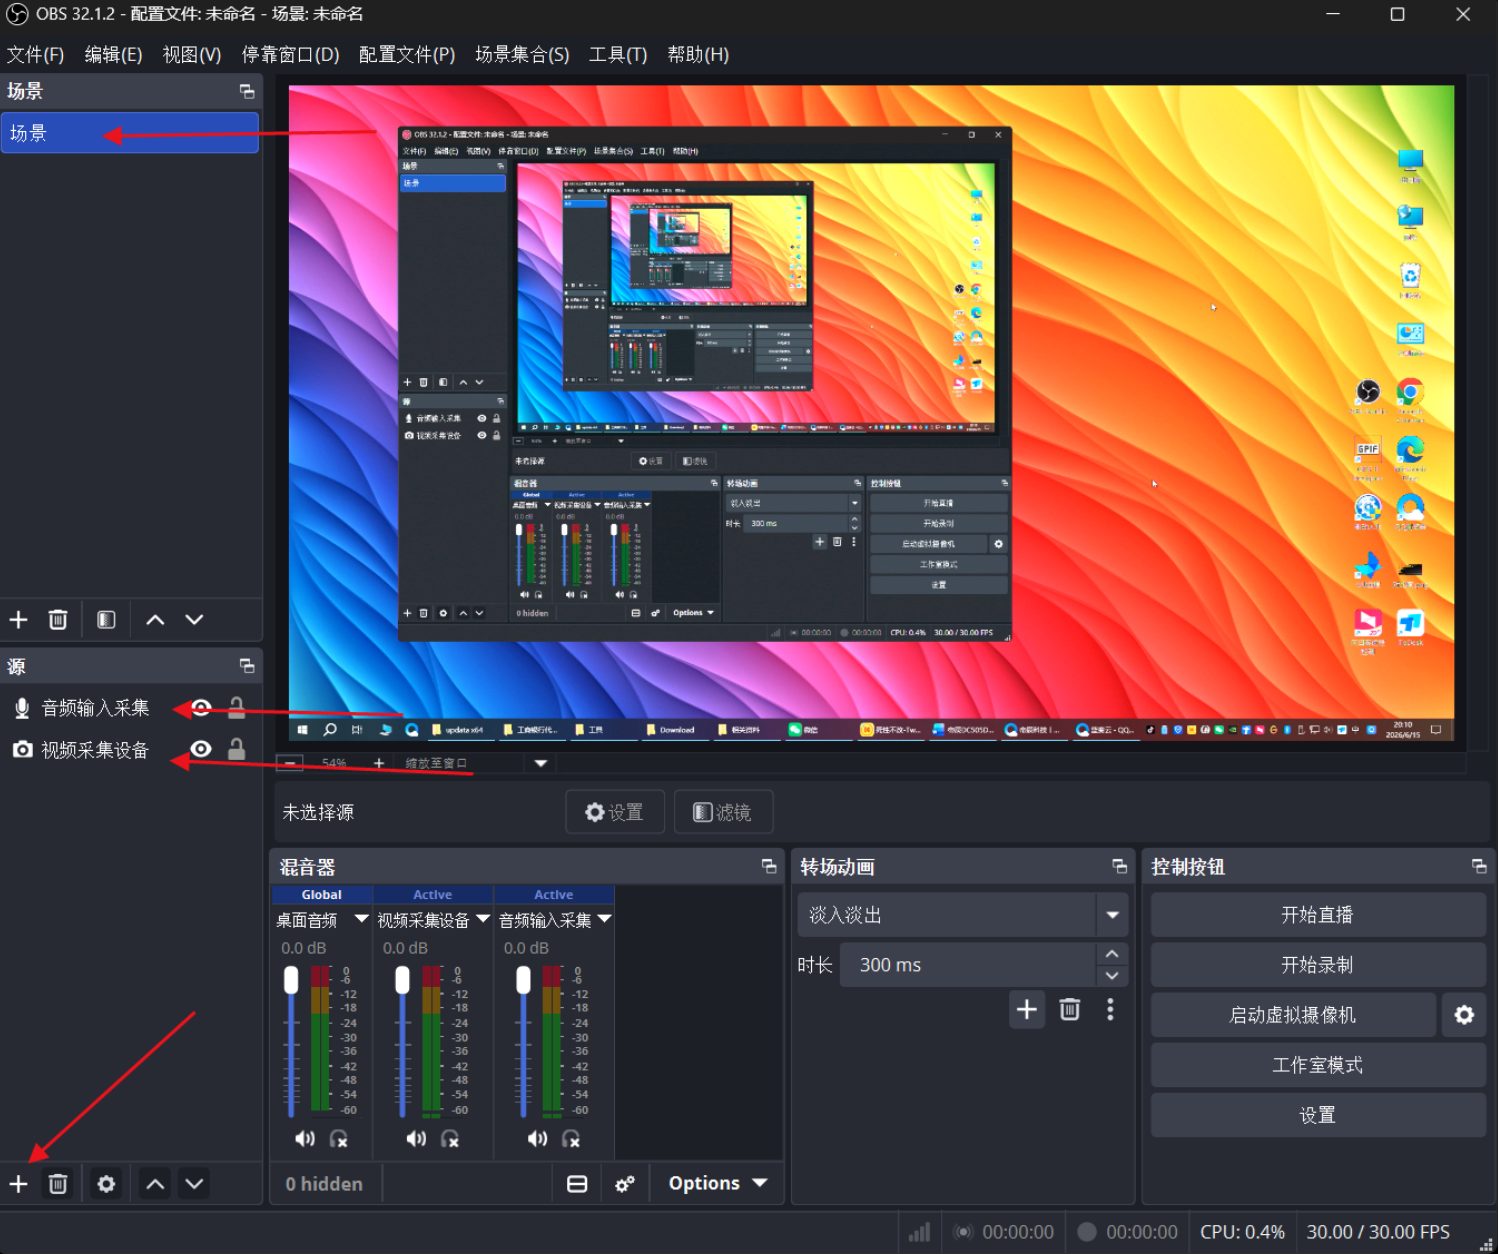
Click + under Sources and choose Video capture device, then select DC550 (the device name the fuser reports) and confirm.
Audio
If the captured picture has no sound, it is almost always the second PC's output device: it needs to be set to the monitor, not to headphones or speakers. If you must keep audio on headphones on that PC, use a USB audio loopback cable to bring it back into the streaming PC.
Quick troubleshooting
| Symptom | First things to try |
|---|---|
| No picture at all | Short-press K1 to read the panel. Check the DC, S1 and S2 lights — each one tells you which link is down |
| Picture but no fusion overlay | Check the RH light. Short-press K4 to switch the displayed source back, or K3 to cycle the fusion mode |
| Display not detected | Hold K1 to try EDID mode B, then C. Confirm the monitor is on a full-bandwidth HDMI 2.1 or DP 1.4 port |
| Flashing or dropouts at high refresh | Check whether you are mixing HDMI and DP — that is unsupported. Try a lower refresh, or 12G link rate on 5070 Ti and newer |
| Capture card missing | Flip the Type-C connector, and confirm the cable reaches a USB 3.0+ port |
| Everything worked, then stopped after a firmware update | Hold K3 for 5 seconds to reset, then power-cycle |
Was this helpful?
Last updated 8 Nov 2026