
DC686 Fuser Setup
Set up the DC686 (DC1A686) Fuser: connections, buttons, indicators, OSD, firmware, EDID injection, and custom refresh-rate timings.
The DC1A686 is a DisplayPort compositor: it takes the picture from your main PC and your second PC and combines them into one image on a single monitor, so the overlay your second PC draws sits on top of the game. This guide covers the connections, the five buttons, the status lights, the on-screen parameters, firmware updates, EDID injection, and how to push a monitor to a high refresh rate.
The source manual is dated 15 October 2026. Specifications and model names follow it.
Downloads
| What | Link | Password |
|---|---|---|
| Common tools (serial driver, utilities) | wwqt.lanzoum.com/b04wf3l0b | 6666 |
Open the link, enter the password in the box it asks for, and the file list appears. It holds the vendor's tools: the Serial Port Management Tool (firmware and EDID), the serial driver, and miscellaneous utilities.
Firmware is not a separate download for this unit — the configuration tool checks the vendor's server and updates the device over USB-C. See Firmware upgrade.
1. Connections

Left to right: DC 12 V power, capture USB-C, data USB-C, secondary PC DP, main PC DP, monitor DP. The silkscreen under each port is in Chinese — the table below gives the same order in English.
| Port | Purpose |
|---|---|
DC 12V | 12 V, 3 A power supply |
Data USB-C | Debugging and firmware upgrades. Can stay disconnected in normal use |
Capture USB-C | Video capture output; requires USB 3.0 or later. Can stay disconnected if you do not capture |
Main PC DP | Main PC graphics card |
Secondary PC DP | Second PC graphics card |
Monitor DP | The monitor you look at |
All three video connections are DisplayPort 1.4, so there is no HDMI/DP mixing to worry about — unlike the HDMI-based fusers.
Important
Use the Data USB-C port for firmware and EDID work, not the Capture port. They are separate connectors and only Data talks to the configuration tool.
2. Buttons

Left to right: K1, K2, K3, K4, K5, then the three indicator pairs, then the red power button. The silkscreen under each button reads 按键K1–K5, so they identify themselves.
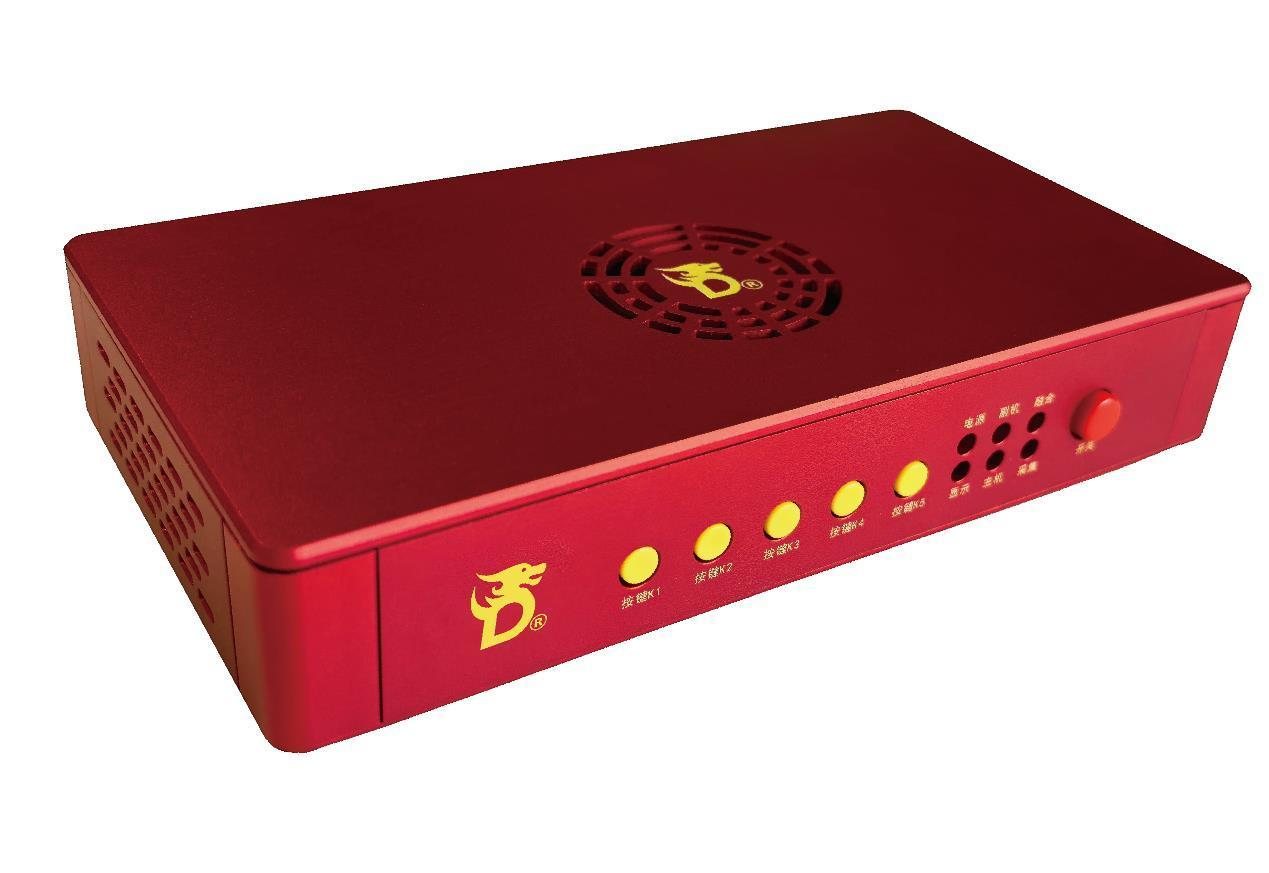
Each button does one thing on a short press and another on a long press.
| Button | Short press | Long press |
|---|---|---|
| K1 | Show the parameters in the top-left corner | 5 s — switch between EDID injection mode and automatic adaptation |
| K2 | Increase chroma-key strength (5–255) | 5 s — regenerate the monitor ID, serial number and other monitor information. The device restarts and the power light flashes rapidly 5 times |
| K3 | Decrease chroma-key strength (5–255) | 3 s — reserved |
| K4 | Switch compositing modes | 5 s — restore factory settings: native EDID back, chroma key to 20, capture to DP0, injected parameters cleared. The power light flashes rapidly 5 times |
| K5 | Show only the main PC or only the second PC, disabling compositing and chroma keying | 3 s — reserved |
Power switch: press in to power on, release to cut power.
Tip
Set chroma-key strength to 20 when the display runs in YCbCr 4:2:2, which is what you will be using for high refresh rates. K2 and K3 nudge it up and down.
3. Status lights

The indicators sit between K5 and the power button. Upper row: power, secondary PC, compositing. Lower row: display, main PC, capture.
| Indicator | Meaning |
|---|---|
| Power | Steady when powered normally |
| Display | Steady when the monitor is connected. Slow flash while connecting; off if the monitor is off or unplugged |
| Secondary PC (upper layer) | Steady when connected. Off means the compositor and the second PC are not talking — check both ends of the cable, restart the second PC |
| Main PC (lower layer) | Steady when connected, slow flash while connecting. Off means check both ends, restart the main PC |
| Compositing | On when compositing is enabled, off when disabled |
| Capture | On while capture is in use |
4. On-screen parameters
Short-press K1 to show these.
| Parameter | Meaning |
|---|---|
DP0 | Main PC (lower layer) resolution and refresh rate. [Y] means only this image is displayed |
DP1 | Second PC (upper layer) resolution and refresh rate. [Y] means only this image is displayed |
EDID mode | AUTO — automatic adaptation (default). EDID — injection mode |
ALPHA | Chroma-key strength. Default 20, range 5–255 |
RH | ON compositing enabled, OFF disabled |
CJ | Capture mode. DP0 captures only the main PC, DP1 captures the composited image |
SN | Monitor serial number currently presented |
ID | Monitor ID currently presented |
FW | Firmware date |
TEMP | Device temperature, live |
DNA | Unique chip identifier |
5. Firmware upgrade
Connect the Data USB-C port to the PC and open the Dichen Technology Serial Port Management Tool (v1.3.0 or newer, from the tools download).
- Select the detected COM port and connect to the device.
- Open the Firmware Upgrade tab. The tool checks the vendor's server automatically, or click Check Firmware.
- If a newer version is listed, select it and click Download and Upgrade.
What to expect: if the compositor is in use, the screen goes black during the transfer. It takes up to about four minutes, after which the device restarts by itself.
Note
The tool also reports the chip DNA, model, program version, build ID, uptime and manufacture date on the same page — useful when you need to tell support exactly which unit you have.
6. EDID injection
Use this to make the compositor present a specific monitor identity, usually to unlock a refresh rate the panel does not advertise, or to fix a display that will not sync.
Connect Data USB-C, open the same tool, go to EDID Management, then:
- Click Select File and choose an EDID
.bin. Click Check File to validate it — the tool reports the size, block count and CRC32. - Click Inject EDID. The tool uploads the file and reads it back to verify.
- Press K1 to confirm the mode. Injection leaves the device in
EDIDmode;Switch to AUTOreturns it to automatic adaptation.
Screen behaviour: in EDID mode the screen goes black for a few seconds while the sink re-handshakes. In the
default AUTO mode it does not go black.
Things worth knowing from the manual's own notes:
EDID V2is shared by the main and second PC — one file, applied to both paths — and is stored in the device's flash, so it survives a power cycle.- The status panel shows whether the file was saved, what mode is currently applied, and whether a switch is still pending. Wait for a pending switch to finish before injecting again.
- If an upload is interrupted, End Stale Session clears the half-finished state before you retry.
- Export Injected Source File and Export Current Working Copy let you download what the device is actually using, which is the fastest way to check what is really applied.
AUTOstays inAUTOafter an injection on supported devices: it replaces the EDID in place and restarts the handshake on both paths.
7. Refresh-rate setup
Start in Windows Display settings. Rates up to 1K 600 Hz / 2K 360 Hz / 4K 160 Hz can usually be selected directly.
For anything above that, and anything missing from the monitor's EDID presets, create a custom resolution in the graphics card control panel:
- If the pixel clock stays under 1430 MHz, you can simply raise the refresh rate and save.
- Above that, choose CVT-RB (Coordinated Video Timings – Reduced Blanking, called "CVT – Reduced Blanking" in older panels), then reduce the horizontal and vertical total pixel counts.
- In some cases, set the colour format to YCbCr 4:2:2 before creating the custom resolution — and remember the chroma-key strength should be 20 for 4:2:2.
Limits that catch people out:
- AMD integrated graphics generally cannot create custom resolutions. Use the default rates.
- Windows 10 caps at 500 Hz. Above that, Windows 11 is required.
- Some monitors need DSC disabled in their own on-screen menu before high rates can be set (the manual cites the MPG341CQR X36).
- Some monitors need the input mode changed from DP 1.2 to DP 1.4, or from AV to PC mode (the manual cites the Samsung LS27FG602SCXXF).
8. What each card can reach
With default settings and only the refresh rate changed:
| Graphics card | 720p | 1080p | 1440p | 2160p |
|---|---|---|---|---|
| RTX 50 series | 1000 Hz+ | 639 Hz | 364 Hz | 164 Hz |
| RTX 30 / RTX 40 | 1000 Hz+ | 550 Hz+ | 339 Hz | 150 Hz+ |
| GTX 10 / GTX 20 | 1000 Hz+ | 480 Hz+ | 271 Hz | 144 Hz+ |
| AMD RX 6000 / RX 7000 | 1000 Hz+ | 639 Hz | 364 Hz | 164 Hz |
| AMD RX 500 / RX 5000 | 1000 Hz+ | 480 Hz+ | 320 Hz | 144 Hz |
720p = 1280 × 720; 1080p = 1920 × 1080; 1440p = 2560 × 1440; 2160p = 3840 × 2160.
9. Recommended custom timings
These are the vendor's figures for pushing a panel beyond its native presets. Test your own monitor's limits carefully — the section after this one is what to do when a timing is too aggressive.
1920 × 1080
With only the refresh rate changed: 50-series cards reach 600–639 Hz, 40-series 540–600 Hz.
| Timing totals | Horizontal | Vertical |
|---|---|---|
| Minimum | 2040 | 1117 |
| Common | 2080 | 1215 |
Example manual timing: active 1920 × 1080, front porch 88 / 4, sync width 44 / 5, totals 2080 × 1215.
2560 × 1440
50-series reach 350–364 Hz, 40-series 320–339 Hz.
| Timing totals | Horizontal | Vertical |
|---|---|---|
| Minimum | 2680 | 1481 |
| Common option 1 | 2720 | 1481 |
| Common option 2 | 2720 | 1525 |
Example manual timing: active 2560 × 1440, front porch 48 / 3, sync width 32 / 5, totals 2680 × 1481, polarity positive horizontal / negative vertical.
3840 × 2160
50-series reach 144–164 Hz, 40-series 120–144 Hz.
| Timing totals | Horizontal | Vertical |
|---|---|---|
| Minimum | 4000 | 2200 |
| Common option 1 | 4000 | 2250 |
| Common option 2 | 4000 | 2332 |
10. No picture after a restart
If a custom refresh rate leaves the compositor frozen with no picture after a restart, there are three fixes. They apply to either PC.
Warning
Whatever you choose, finish all three steps: delete the custom resolutions, change the colour format to YCbCr 4:2:2, then recreate the resolution. Skipping to a new resolution without deleting the old one is what causes the same freeze again.
Solution 1 — regenerate the monitor information (recommended). Hold K2 for 5 seconds. The device regenerates its monitor ID and serial, and the PC sees it as a brand-new monitor. In NVIDIA Control Panel, delete every previously created custom resolution, set the colour format to YCbCr 4:2:2, and recreate the resolution.
Solution 2 — connect the monitor directly. Unplug the compositor and connect the monitor straight to the PC, using the same DisplayPort connector on the card — NVIDIA's settings differ per connector. Delete the custom resolutions, reconnect through the compositor on that same connector, set YCbCr 4:2:2, and recreate the resolution.
Solution 3 — use another DisplayPort connector. Move to a different DP output on the card and recreate the custom resolutions there. NVIDIA does not synchronise these settings between connectors, so the old ones do not carry over.
This problem only affects custom resolutions — stock refresh rates are unaffected.
Quick reference
| Symptom | First thing to try |
|---|---|
| No picture, display light off | Check the monitor cable and power; the Display light should be steady |
| One PC missing from the picture | Check the Main PC / Secondary PC indicator; restart that PC |
| Compositing stopped working | Check the Compositing light, press K4 to cycle modes, K5 to switch sources |
| Nothing responds after a firmware update | Hold K4 for 5 seconds to restore factory settings |
| High refresh rate not offered | Section 7: YCbCr 4:2:2, CVT-RB, then custom timings from section 9 |
| Frozen after a custom resolution | Section 10 — and delete the old resolutions first |
Was this helpful?
Last updated 8 Nov 2026